
Create a RESTful API with Flask and Flask_RESTful
-
date_range 07/04/2020 07:06 infosortPython-FlasklabelPythonFlaskFlask_RESTfulWebAPI
Create a flask RESTful API using the Flask_RESTful package with Flask.
In this tutorial we will build a basic RESTful web service that will serve the current time and date, based on your location.
Tutorial Overview
In this tutorial we will discuss the following:
- What is an API
- Basic API design
- Building a basic RESTful API endpoint
What is an API
API, which stands for Application Programming Interface, is an interface that define how other software components or systems can interact with your application. It defines the kinds of calls or requests that can be made, how to make them, the data formats that should be used, the conventions to follow etc.
APIs are the defined interfaces through which interactions happen between an enterprise and applications that use its assets, which also is a Service Level Agreement (SLA) to specify the functional provider and expose the service path or URL for its API users. An API approach is an architectural approach that revolves around providing a program interface to a set of services to different applications serving different types of consumers.
When used in the context of web development, an API is typically defined as a set of specifications, such as Hypertext Transfer Protocol (HTTP) request messages, along with a definition of the structure of response messages, usually in an Extensible Markup Language (XML) or JavaScript Object Notation (JSON) format.
An example might be a shipping company API that can be added to an eCommerce-focused website to facilitate ordering shipping services and automatically include current shipping rates, without the site developer having to enter the shipper’s rate table into a web database.
APIs have different design style: *RESTful *SOAP *Webhooks *GraphQL *gRPC
For a better understanding about the differences, please read this article
In plain English you can build an API to produce data that other systems can consume, or you can build an API that can consume data from other systems in your own application.
In this example we will produce data for other systems to use through a RESTful API. Our API will be waiting to be invoked by an external party, which will provide us with a time zone name, and we will send back the time for that time zone. In addition, we will also have an API available to obtain all the available time zones.
Basic API Design
For us to accept a request for data from another system, we must be able to provide them with an address where the information can be obtained from. A URL (uniform resource locator) will need to be provided to any consumer to be able to obtain the data that we will be providing. The URL will consist out of the following components:
- server_host - The physical server location, this can either be a DSN name or an IP address. In our case whilst still in development we will be hosting on our local machine adress 172.0.0.1 / localhost
- server_port - The port on which the API will be hosted. In our case during development we will be hosting on port 5000
- time_by_timezone - The time_by_timezone will be the endpoint, which will describe which function we need to perform, like in this case the function to get the time by time zone name
- {input_value} - The name of the time zone as input
- ? - Additional query parameters can be added to provide extra capabilities for the function
- format=”” - In this case the user can define the format in which they expect to receive the output ex. “dd-mm-yyyy HH:MM:SS”
The HTTP method used will also determine the layout of the address.
Our example will look like this during development:
http://127.0.0.1:5000/api/v1.0/time_by_timezone/Johannesburg?format="dd-mm-yyyy HH-MM-SS"
and once deployed we would expect it to look something like this:
http://lambrie.github.io:5000/api/v1.0/time_by_timezone/Johannesburg?format="dd-mm-yyyy HH-MM-SS"
For a RESTful API we will also need to assign a method to each address. The following methods are available:
- GET - Use GET requests to retrieve resource representation/information only – and not to modify it in any way.
- POST - Use POST APIs to create new subordinate resources
- PUT - Use PUT APIs primarily to update existing resource
- DELETE - As the name applies, DELETE APIs are used to delete resources
- PATCH - Use PATCH requests to make partial update on a resource
We will not be making any modifications to data. Therefore, we will be using the GET method for our API’s.
We will also need to decide in which data format we will deliver the data back to the requestor. We can use any of the following data formats for data exchange:
- HTML - Hyper Text Markup Language
- XML - Extensible Markup Language
- JSON - JavaScript Object Notation
- Text - Plain text
- PDF - PDF documents
- JPEG - JPEG image documents
In this example we are going to return the data in JSON format. Why you may ask? RESTful APIs depend on easy, reliable and fast data exchanges. JSON fits the bill for each of these attributes and python comes with built libraries to handle JSON as native data type. Also, the Flask-RESTful package supports json by default
The above component is important to understand as they will play a role during our development
For more information regarding RESTful API design principle following this (link)[https://restfulAPI.net/]
Building a basic RESTful API endpoint
Create a new project with a virtual environment. I will name mine flask_restful_timezones
Install Packages
For this project we will need to install the following packages:
- flask
- flask_restful
- pytz
pip install flask
pip install Flask-RESTful
pip install pytz
Create main code file - app.py
Create an app.py file within your project directory root.
We can start by importing all the required packages we just installed and some built-in packages into our app.py file
from flask import Flask
from flask_restful import Api, Resource, reqparse
from pytz import all_timezones, timezone as tz
from datetime import datetime
import os
Create config code file - config.py
Create a config.py file also within your project directory root.
We will also setup a config file to house all our configurations, which can be used across multiple environments. We will setup the config file with 3 environments:
- Production
- Testing
- Development
The environment selection will then be driven of an environment variable indicating to our appliction which environment it is running. Therefore, we can set our environment variable so long. Within your command prompt, ensure your virtual environment is activated, type the following to set the environment variable on your operating system:
Windows
set Environment_Config=config.Development
Linux / MaxOs
export Environment_Config=config.Development
Environment variables are very useful when it comes to managing configurations and protecting sensitive information, such as passwords etc.
Within your config.py file add
class Config(object):
    '''
    Each environment will be a class that inherits from the main class config

    Configurations that will be the same across all environment will go into config,
    while configuration that are specific to an environment will go into the relevant environment below
    ''''
    SECRET_KEY = "My$uper$ecretKey4Now"
    SERVER_TIME_ZONE = "Africa/Johannesburg"
    DEFAULT_DATETIME_FORMAT = "%Y-%m-%d %H:%M:%S"

class Production(Config):
    FLASK_ENV = 'production'
    PRODUCTION = True

class Testing(Config):
    FLASK_ENV = 'testing'
    TESTING = True

class Development(Config):
    FLASK_ENV = 'development'
    DEBUG = True
Initialize Flask and Flask-RESTful
In order to initialize Flask, we need to provide the required configuration for Flask to start up. So, we will need to import the config.py file with the Config class into our app.py file to initialize a Flask instance with the configurations specified for the environment within which we are going to work in.
from config import Config

app = Flask(__name__)
app.config.from_object(os.getenv('Environment_Config'))

api = Api(app)
Flask has a built-in function to retrieve configurations from an object using the config.from_object function. In this case we will pass the location of the config class to the built-in function, by calling the os.getenv(‘Environment_Config’) function.
For us to utilize the Flask-RESTful extension package we need to initialize the Flask-RESTful package with the flask object as the parent from which it will need to inherit from.
Resources
The main building block provided by Flask-RESTful are resources. Resources are built on top of Flask pluggable views, giving you easy access to multiple HTTP methods just by defining methods on your resource. Therefore, we need to create our own resources and add them to the API. This is very useful as we can logically separate different functions our application needs to perform and make sure that code performing similar functions are logically grouped.
We can split each resource out into its own file also within a resource’s directory, which can also make it easier to manage as your application scales
We will be creating the following functions in our API application:
- Return a list of all time zones
- Return the current date and time for any city on the list
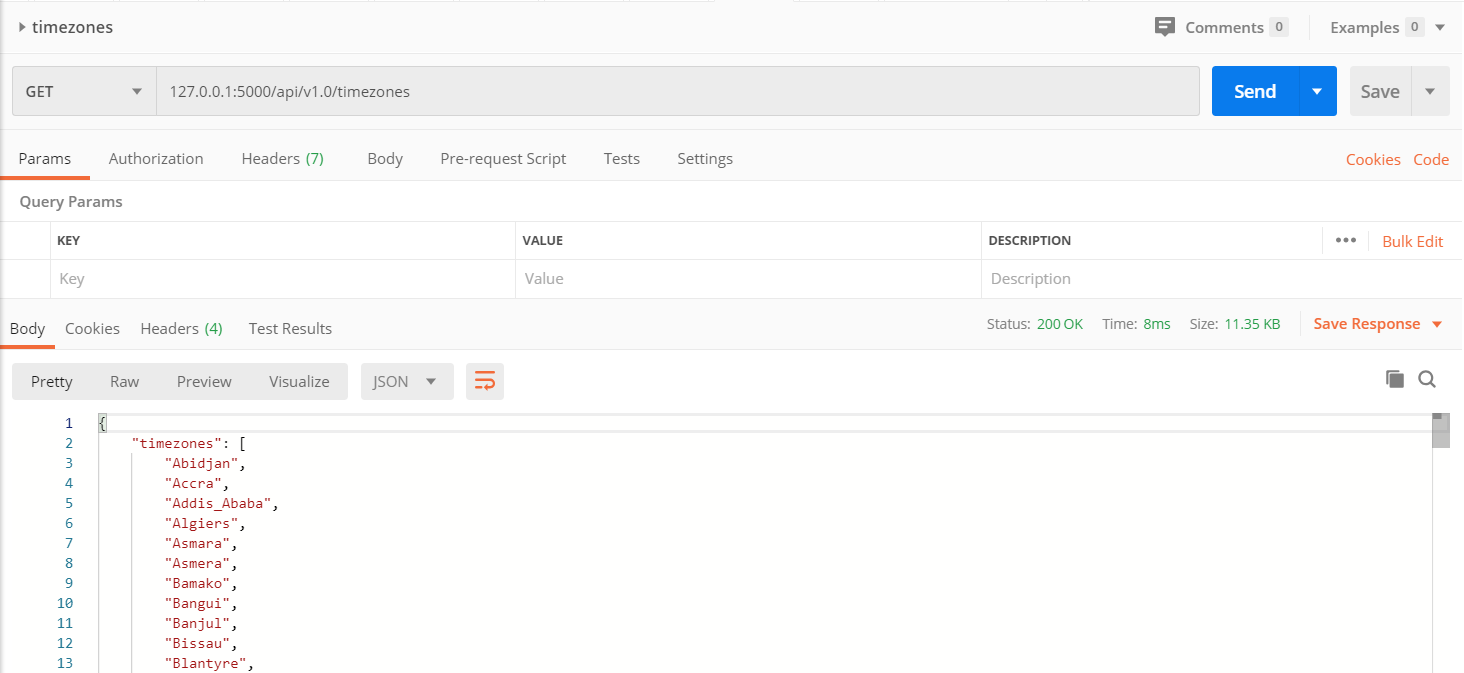
Return a list of all time zones
Let’s first create an API to show all available time zones for which we can return the current date and time for.
For this endpoint we will not be expecting any input from the consuming system. We will just provide a full list of all available time zones to our consumer when this endpoint is invoked.
In order to do this, we will create a class called All_Timezones, which will inherit from Resources, which we imported from flask_restful above
# Resource classes

class All_Timezones(Resource):
    def get(self):
        timezones = []
        for timezone in all_timezones:
            try:
                timezones.append(timezone.split("/")[-1].title())
            except IndexError:
                timezones.append(timezone.title())
        return {"timezones":timezones}

    def post(self):
        pass

    def put(self):
        pass

    def delete(self):
        pass
Above you will see that we define each http method within the class (resource, in this context), as discussed during the design section. Because we will only be returning data and not be making any changes we only need the get method.
The get method will get the list of all cities listed in the all_timezones list, which we import from the pytz package. We will then loop through the list and split out the continent from the name using the split function. We can easily split out the continent because we know the format of the list. The following logic will then be applied on each iteration:
- Firstly, we will initialize an empty list, which will be the result we return at the end
- We will loop through all the time zones availble in the pytz package all_timezones
- Within each iteration we will check if the continent/country is included in the name. The list from pytz is not consistent all the way through, as in some cases it only includes the time zone name and in other cases it might include the continent and/or the country
- We will the split the time zone name by “/” and always assume the last index as the time zone name, therefore we reference the index -1
- We will add each time zone to the timezones list and format the name to title case
- We will then return the timezones list in a dictionary with key “timezones”, containing the list of time zones
Then we need to register the resource we just defined as a class to the API instance in the app.py file
# Register Resources
api.add_resource(All_Timezones, '/API/v1.0/timezones', endpoint="get_all_timezones")
The URL for this API will then be as follow:
localhost:5000/api/v1.0/timezones
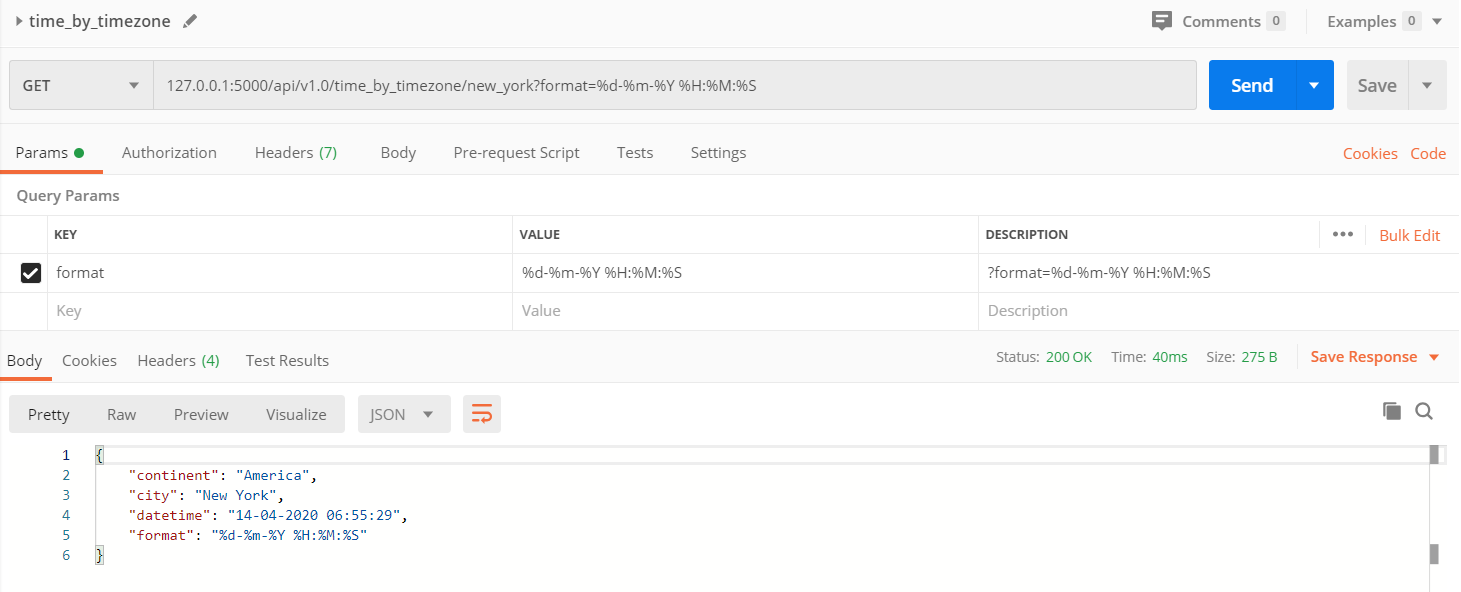
Return the current date and time for any city on the list
With this final endpoint we will be able to retrieve the current date and time for a specific time zone.
In this case the consumer will need to provide the name of the time zone. We will also add an optional parameter for the consumer to their preferred date time format in which they expect to consume our result.
Again, the same as above we need to create a resource and register the resource to Flask_RESTful, so again within the app.py file
class Time_By_Timezone(Resource):
    def __init__(self):
        self.parser = self.setupParser()
        self.args = self.parser.parse_args()
        self.server_time = tz(Config.SERVER_TIME_ZONE).localize(datetime.now())
        super(Time_By_Timezone, self).__init__()

    @staticmethod
    def setupParser():
        parser = reqparse.RequestParser()
        parser.add_argument('format', type=str, location='args', required=False)
        return parser

    def get(self,timezone):
        format = self.args.get('format',None)
        if format is None:
            format = Config.DEFAULT_DATETIME_FORMAT

        for _timezone in all_timezones:
            if timezone.lower() in _timezone.lower():
                try:
                    continent = _timezone.split("/")[0].title()
                except IndexError:
                    continent = None
                timezone = timezone.replace("_"," ").title()
                client_tz = tz(_timezone)
                client_dt = self.server_time.astimezone(client_tz)
                client_dt = client_dt.strftime(format)
                return {"continent": continent, "timezone": timezone, "datetime": client_dt, "format": format}
        else:
            return {"error":"Timezone not found"}, 404

    def post(self):
        pass

    def put(self):
        pass

    def delete(self):
        pass
In this case the class will look slightly different to the previous one, as we are initializing this class with the request parser. Because, this endpoint is enabled to accept an additional parameter
- We added the init function to the class, to specify the instructions for initiation
- We then initiate the request parser, by calling a static method called setup parser.
- The setup parser initializes the request parser and defines the expected arguments which we would expect in the parameters from the consumer.
- We then return the parser to the class assign it to the parser attribute
- We then parse all arguments received from the consumer in the parameters field and assign it to the args attribute of the class
- We initialize the server location to assist with the below function also as an attribute to the class
Within the get method the actual functionality will then be executed:
- We will then obtain the format specified by the consumer. Using the get function protects us from unspecified parameters. The get will return a none value from the args attribute if the format parameter was not present.
- Then if the format parameter was not specified we will use our applications default configuration, which can be set in the config.py file
- We will then perform a loop of all available time zones in the all_timezones variable imported from pytz
- We will then compare each timezone in the list to the input timezone received from the consumer. We compare the values using the lower case values of both and check using the in operator to ensure the search term appears somewhere in the text
- If “/” are found in the matching string we can strip out the first word and assume that it might be the continent. If it is not present we will return a none value for the continent field
- The next step we need to do is clean up the input value to return a useable display name. For instance, a timezone like New York, which contains a space, needs to be cleaned up as the space would contain an underscore
- We then obtain the timezone from the pytz package, based on the matching criteria. And we then initialize the pytz package based on the value obtained from the consumer
- We then obtain the date time for the input based on our server location settings using the astimezone function from pytz
- Then using the datetime package we format the date time according to the consumers format if specified, else it will default to the application default settings
- The application will then return the result containing information regarding the timezone, continent, datetime value and format applied
In the case the input values did not match any time zone in the pytz package an error would have been returned specifying “Timezone not found”. The Flask-RESTful package allows you to define response codes, in this case we returned a data dictionary with a response code of 404 meaning the resource was not found.
Lastly again, we will need to register the resource we just defined as a class to the API instance in the app.py file under the “Register Resources” header
# Register Resources
api.add_resource(All_Timezones, '/api/v1.0/timezones', endpoint="get_all_timezones")
api.add_resource(Time_By_Timezone, '/api/v1.0/time_by_timezone/<string:timezone>', endpoint="get_time_by_timezone")
The URL for this API will then be as follow:
localhost:5000/api/v1.0/time_by_city/new_york
localhost:5000/api/v1.0/time_by_city/new_york?format=%d-%m-%Y %H:%M:%S
Run the application
To run the application, you can either use the flask command, python’s -m switch with Flask or add name == ‘main’.
Ensure the environment variable for Environment_Config was set as explained above
- flask run
flask run * Environment: development WARNING: This is a development server. Do not use it in a production deployment. Use a production WSGI server instead. * Debug mode: off * Running on http://127.0.0.1:5000/ (Press CTRL+C to quit) - python -m flask run:
python -m flask run * Environment: development WARNING: This is a development server. Do not use it in a production deployment. Use a production WSGI server instead. * Debug mode: off * Running on http://127.0.0.1:5000/ (Press CTRL+C to quit) - Recommended option would be to add to the bottom of your app.py scripts and executed in terminal (in same directory as your app.py file)
if __name__ == '__main__':
 app.run()
python app.py
Test the application
Once the server is up and running we can invoke the endpoints to test them.
We can either use an API development/testing tool such as Postman, or we can use a curl command from our command line
Postman
curl
curl 127.0.0.1:5000/API/v1.0/timezones
{
    "timezones": [
        "Abidjan",
        "Accra",
        "Addis_Ababa",
        .
		.
		.
		"Zulu"
		]
}
curl 127.0.0.1:5000/API/v1.0/time_by_timezone/new_york?format=%d-%m-%Y %H:%M:%S
{
    "continent": "America",
    "city": "New York",
    "datetime": "14-04-2020",
    "format": "%d-%m-%Y"
}